Tag Archives: boardgame

Scenario Review – Saint Roche Station

Saint Roche Station is an early-war scenario for Memoir ’44 from the Equipment Pack‘s Additional Scenarios booklet.  You can download the bonus scenarios from the Equipment Pack page in a single PDF, but oddly they have not been entered into the scenario database.  The Equipment Pack scenarios are pretty uneven, and while this one is not the worst, it’s also got a pretty major problem.

Following some disastrous fights during the Battle of France, the British Expeditionary Force found itself cut-off from the rest of the French army and surrounded in the port-city of Dunkirk.  Remnants of the British army engaged in some desperate rear-guard battles against the German advance to help the B.E.F. evacuate by sea.  One such battle took place near Saint Roche Station, where the ad-hoc force of British rifle squads armed with HC Boys anti-tank rifles and light machine guns delayed elements of the 7th Panzer division avancing from the Somme to the Seine.  A forward anti-tank gun managed to put one of the German tank sections out of action.  Believing they faced a well-equipped enemy, the Germans slowed down and opted to pound the British positions instead of rushing them.  This bought the B.E.F. some crucial time, but by nightfall the British forces had run out of ammunition and were forced to surrender.

The stage is set, the battle lines are drawn, and you are in command.  The rest is history.

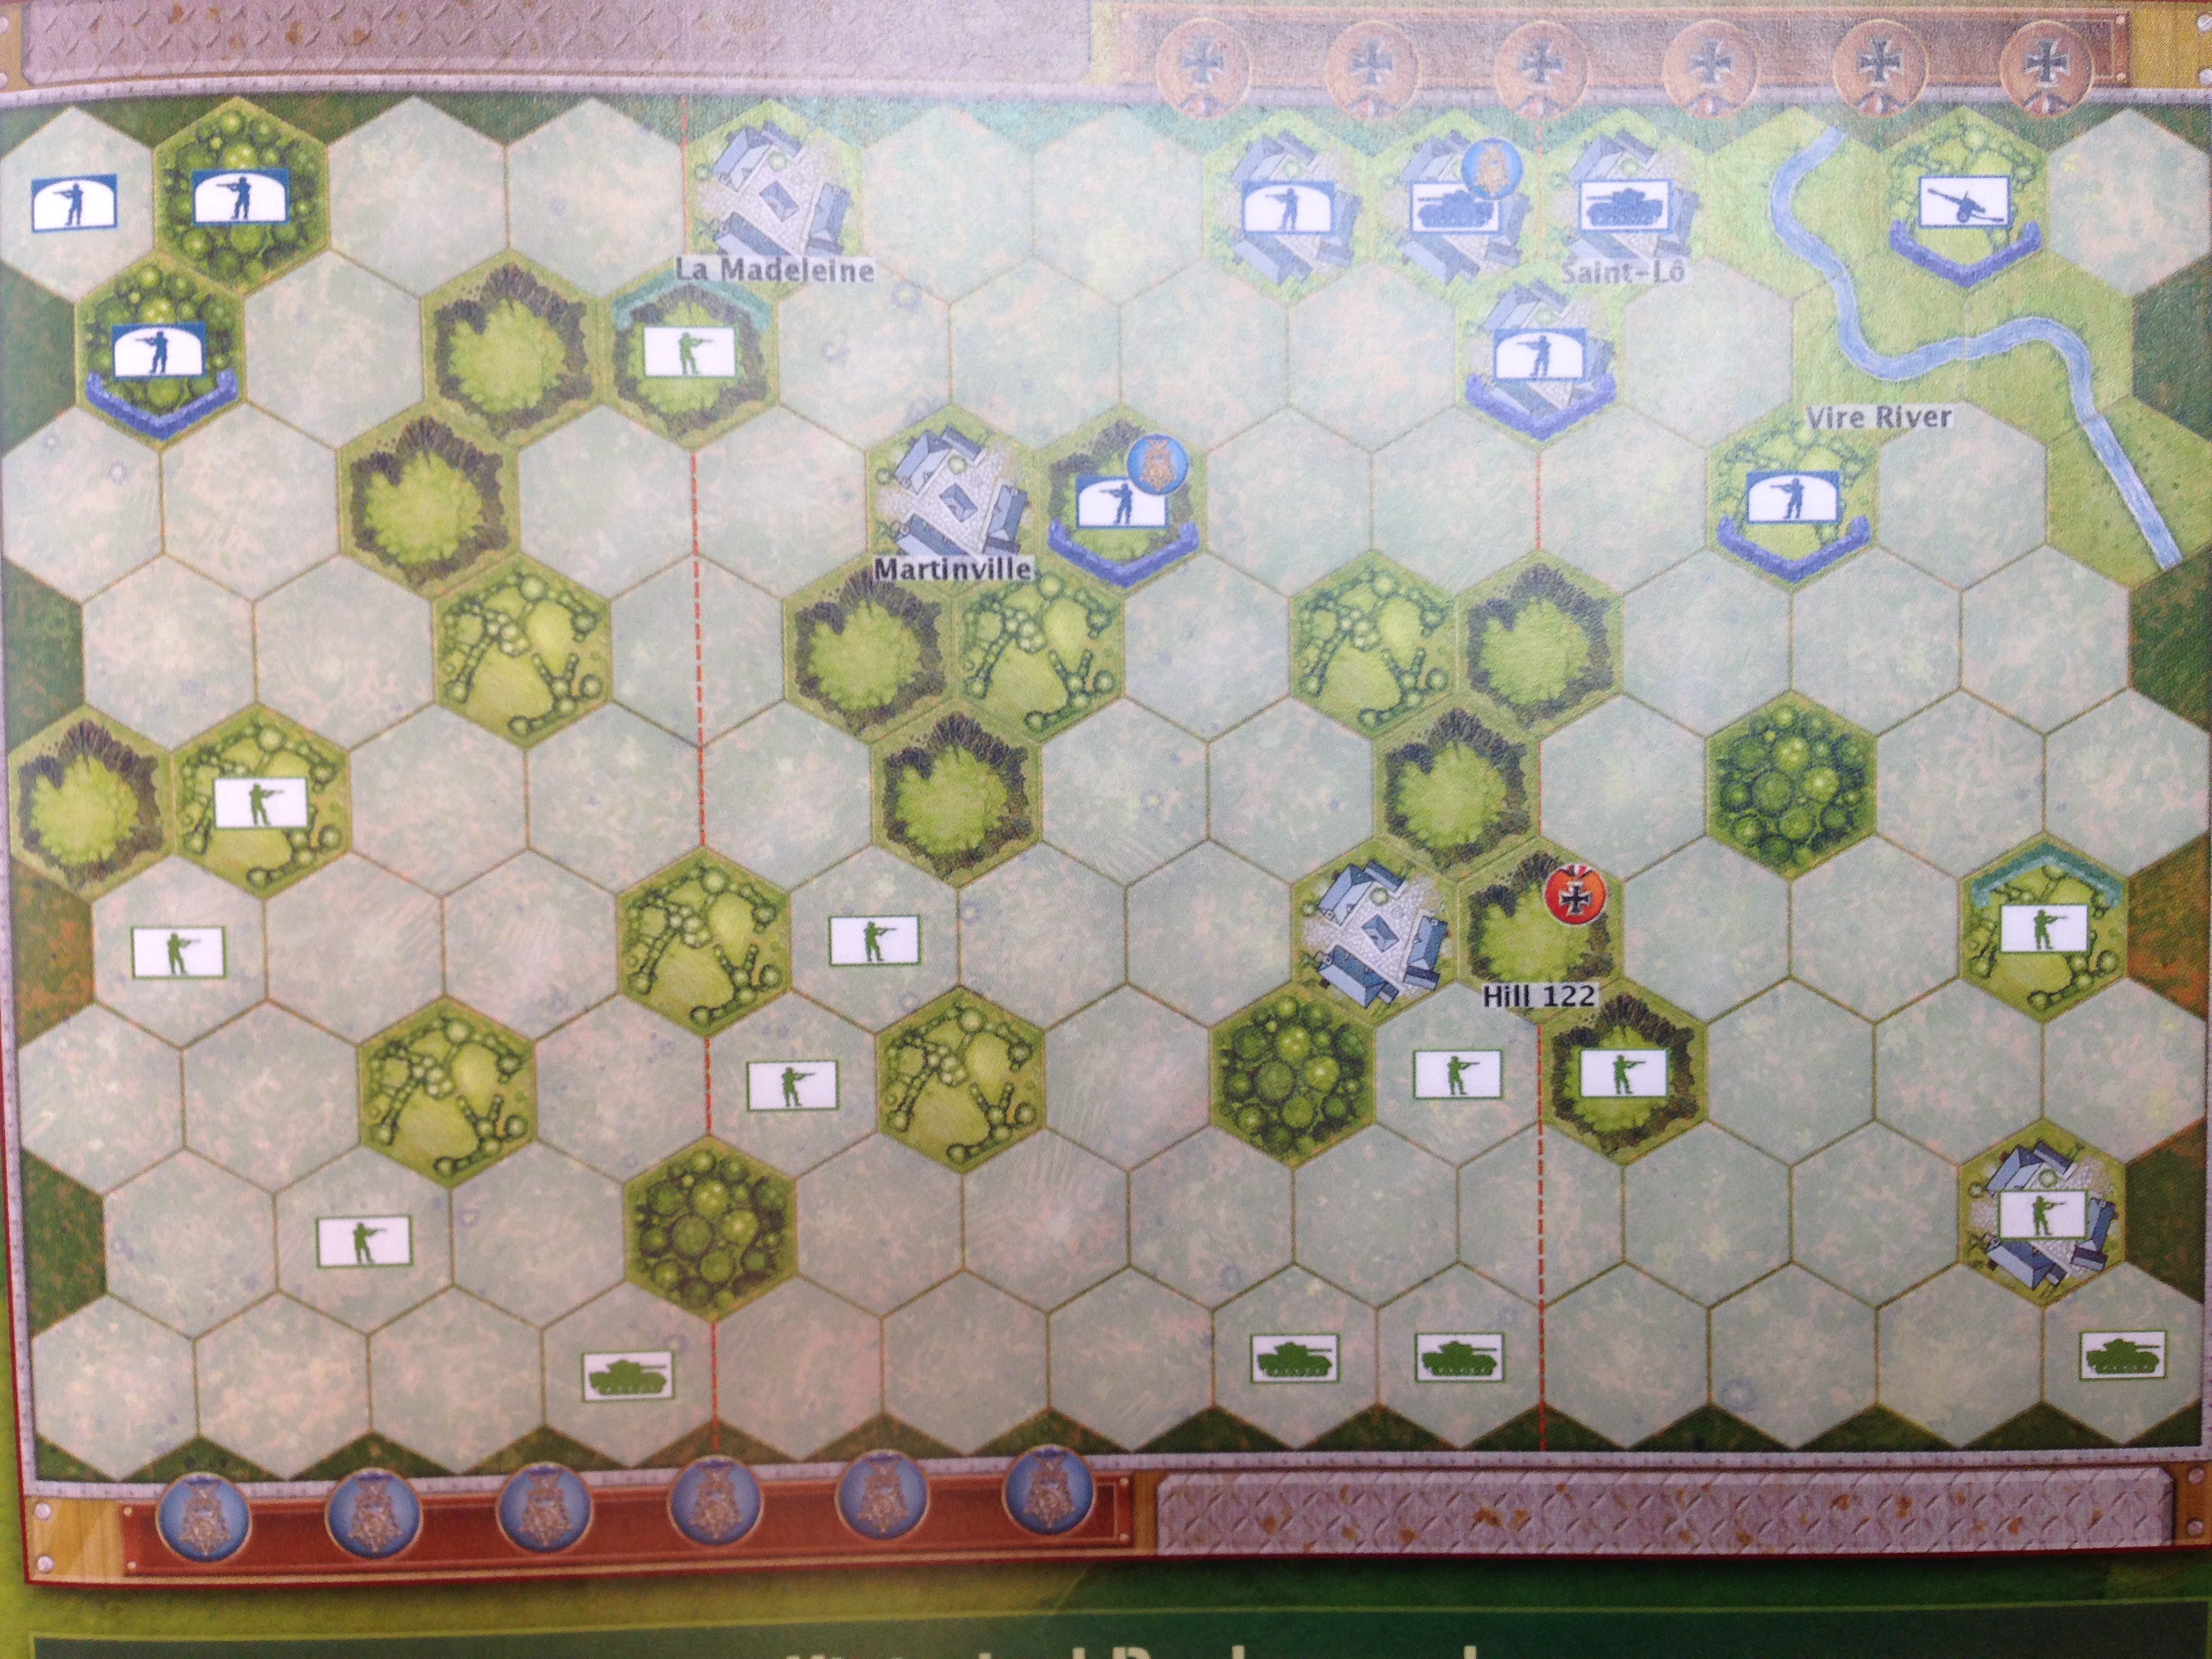
The scenario setup actually mirrors that situation reasonably well – the problem is that the rules of the game make this sort of historical battle not very fun.  Here’s my photo of the map.

Saint Roche Station

The Axis have an overwhelming advantage in total forces, and in mobility, and in firepower.  The British infantry are dug into positions from which there is no retreat, and in which no counter-attack is feasible.  Worse, the Axis artillery can break the British forces without an advance.

In reality, the Germans did not know the strength and composition of the British forces, and used their artillery to break an inferior force.  That describes the worst possible sort of Memoir ’44 scenario, and as laid out, this is not a battle which I can recommend.  The German armor is clustered into the corner, hedged in by an anti-tank infantry and a rail line.  The British forces can only hope to get lucky on their plinks, and unless the Germans move forward they don’t have much hope of doing 5 medals worth of damage.

I found that changing out the German artillery piece for a 2nd mortar crew improved this scenario quite a bit.  The German player had more of an incentive to move forward, and the British forward infantry had a greater chance to retreat for effect.  Still, it’s not one that I can rate highly.

Overall Evaluation – 2/5 – I’d bump this to 3/5 with the suggested fix, but it’s still not great.  The British just don’t have any options.

Balance Evaluation – strongly German favored – The Brits would need some truly spectacular luck to prevail in this one.

Plink-Fest Danger – High – With the German mortar and artillery, combined with their total superiority in the open thanks to the armor, they can win this one from range easily.

First-turn win danger – None

Scenario Review – Battle of Gela

Battle of Gela is an Operation Husky scenario for Memoir 44 by jdrommel which focuses on the early stages of the landings in Sicily.  It’s an unusual map because it features an Axis force attacking an Allied force which has already occupied the beaches.  The setup gives the Italian forces a chance, but as in reality, the balance was distinctly in the favor of the Allies.

On the 10th of July 1943, during operation Husky (Allied landing in Sicily), the harbour of Gela was captured by US Rangers units while the 1st US Infantry Division (the Big Red One) landed on the beaches around the city. Axis reacted quickly and Italian general Guzzoni sent at once troops against the US beach head. At 09h00, the Italian Mobile Group “E”, equipped with French R-35 tanks, made a counter-attack against landed troops,followed by infantrymen of the “Livorno” division. The Italian attack was a menace for the US supplies depots created on the landing beaches and in the harbour. The battle was fierce all the day and ended in a street fighting where US Rangers destroyed several Italian tanks with bazookas and grenades. In the same time the fire of the US Navy inflicted heavy losses to the Italian troops in the open ground. The counter-attack failed, Italian troops withdrew. Gela stayed in US Rangers hands.
The stage is set, the battle lines are drawn, and you are in command. The rest is history.

Here’s a screenshot of the map.

Battle of Gela

Note the Rangers holed up in Gela at the bottom, guarding two Axis victory medals.  I think this might be the first time I’ve seen the Italian victory medal placed in an offensive location.

The biggest tactical decision the Allied player will make is, “What do I do with the Rangers?”  The Axis player cannot win without killing one of them, or taking one victory medal, giving the Allied player the option of holding out on the defensive up to the very end.  This can work because of the two destroyers patrolling off the coast.  This gives them long-term firepower superiority which the Axis simply cannot match.

With a strong opening hand, the Axis can make a credible bid to win this battle.  They have the infantry to push forward into the town of Gela, and their two armor units keep the Allies from feeling too confident about charging out of cover.  However, unless things move quickly in their direction, the Axis player is going to start feeling the pain of constant long-range bombardment.  If the Axis do make a push into Gela town, it will be quickly decisive in one direction or the other.  On the other hand, a lucky Barrage by the Axis player in the early turns might knock out a ship, changing the balance of the game entirely.

This is an interesting battle because of how rare it is for the offensive player on a beach map to start on the inland side.  However, from our playtests, it seems like even an excellent Axis opening can only ensure that the battle will be close.  For our first game, my regular opponent (as Axis) opened with two Move Outs and two Infantry Assaults, while I was stuck with a hand full of center cards.  He quickly gained five medals, but found it incredibly difficult to finish me off for the final medal.  The battle quickly turned stupid, as I advanced a Ranger unit into the open to attack his tanks … and killed them both.  His backfield infantry, most of which had used Italian super-retreat to get off the beaches after his initial success, finally won the game.  For our second game, as Axis, I had nothing but probes, and felt lucky to end the battle with three medals.

Overall Evaluation – 3/5 – This is not a bad map, but the fact is that being inevitably destroyed by artillery just isn’t all that fun, and the novelty value wears off quickly.

Balance Evaluation – Allied Favored – DoW Online rates this as 61/39 Axis favored, but fully a third of those games were jdrommel playing himself, and another third were using a mysterious variant on Vassal.  Sure, the Allies can give this away by pushing forward with their Rangers, but why?

First Turn Win Possibility – None – This scenario will be decided late, not early.

Plink-Fest Danger – Moderate – So long as the Axis tanks are intact, the Allied player should keep his units back in cover.  However, an overly cautious Axis player will be mauled by naval fire, conceding the battle before it really gets started.


Scenario Review – Night Withdrawl

Night Withdrawal is a very odd scenario from the “Taking Caen” campaign from the First Campaign Book, for Memoir ’44.  It uses a variant of the night rule wherein die rolls decrease visibility, leading eventually to full night, and it provides the Germans with an exit point along their own baseline.  It’s certainly original.

Charnwood was the operational codename given to the mission of taking Caen, the elusive D-Day objective that the Germans still held on July 7.

The Allied plan progressed at a slower pace than expected, but was forcing the German command to rethink their hold on the city. Rommel, the commander of Army Group B, ordered that all equipment be withdrawn across the Orne River to make a stand in Caen on the south bank of the river and allowing Allied troops to occupy all of Caen on the north bank. On the night of July 8-9, Axis forces began the withdrawal. They left behind rearguards to prevent the Allies from advancing too fast and managed to establish new defensive positions on the far side of the Orne.

The stage is set, the battle lines are drawn, and you are in command. The rest is history.

Here’s a photo of the map.

Night Withdrawl

The German exit point on their baseline is the defining feature of this game.  It allows the German player to quickly and simply withdraw from the map, and build a nearly insurmountable lead with little effort.  Furthermore, every retreat rolled against the Axis player pushes them closer to this goal.

One can imagine a situation in which the Allied player might open up with an infantry assault on their right flank, and attempt to close off the bridge approach.  The Axis player has sufficient firepower to make this a very risky strategy.  Then again, it’s hard to imagine anything else that can stop an Axis player from pulling everything back, and winning by retreat – other than an Axis hand devoid of center cards.

This map is trying to do something different, and for that, I must give the author, regular contributor Brumbarr44, a fair amount of credit.  But it is bizarre and imbalanced in a strange way.

Overall Evaluation – 2/5 – A reasonable Axis hand can turn this into an incredibly boring scenario in which the Axis win without firing.  However, at least it’s original.

Balance Evaluation – Axis Favored – Even if the Axis player can’t win by pure retreat due to a center-poor hand, the Axis defensive position is not all that bad – and it gets better and better the worse the visibility.  DoW puts this at 52/48 Axis, but reading through the battle reports I see a fair number of campaign players, or games in which barrages were played illegally.

First Turn Win Possibility – None – This is a slow-drip sort of map.

Plink-Fest Danger – None – Only the dumbest Axis player will end up in a tit for tat plink-fest, when withdrawal is a vastly preferable option.

Scenario Review – Operation Epsom

Operation Epsom is, perhaps, my favorite scenario from the Equipment Pack for Memoir ’44.  A lot of Breakthrough-sized Normandy scenarios fail to create an effective balance between Allied firepower and numbers, Axis armor superiority, and the naturally defensive terrain.  Operation Epsom get the balance just about right, creating a tough and interesting battle for both players.

Operation Epsom was General Montgomery’s plan to outflank and seize the German-occupied city of Caen. VIIIth British Corps’ main objective was to break through the German lines by crossing the Odon River and driving for Hill 112. On June 26, the 15th Scottish Infantry Division supported by tanks of the 31st Brigade began its push, gaining a foothold across the Odon near Tourmauville. By the 28th, the Germans began two strong flanking attacks, with the intention of pinching out the British salient. Over the next 2 days, these counter-attacks devolved into a stalemate due to tenacious resistance by the British.

The stage is set, the battle lines are drawn, and you are in command. The rest is history.

Here’s a photo of the map.

IMG_0411[1]

The river is the defining feature of this map, but a second key element is not visible.  The British player can choose 4 of his/her tanks and designate them as “Hobart’s Funnies,” with an ability of his/her choosing.  Proper use of Bridges, Fascines, Mine-sweepers, and Petards are absolutely critical to the British advance, and they can change the flow of the battle dramatically.

One of the great things about this map is that both players have the option of starting the battle offensively or defensively.  The British player is clearly the attacker, and has an easy target on his/her right flank, where there are 3 easy kills and the medal at Grainville.  However, it might make sense to make a few preparatory moves on the center or the left, both to get units away from a no-retreat position vs. the German 88 and to prepare for a decisive river crossing.  The Germans, on the other hand, can open fire with the 88 in the center or their standard artillery near Grainville.  Or, he/she can pull back from Grainville, and prepare for a better stand on the north bank of the river.  Or, he/she can bring armor and artillery forward.

At some point, the British player is going to make a push across the river.  Another great thing about this map is that it’s hard, but possible for the British player to go on the offensive in this way, and actually win.  There are enough targets and medals for a bloody river crossing to pay off, even if the British player never establishes a consistent bridgehead on the north bank.  On the other hand, the German player has the armor and artillery to play an effective game of whack-a-mole, presuming that cards and dice are cooperating.

Much as I love this map, it does have one flaw.  Both sides start with a ton of artillery, and if the British player decides to play it safe and plink from across the river, this will turn into a very long and very boring scenario.  By natural inclination I am not inclined to play in this manner, but cautious min-maxers should probably avoid playing as the British unless they actually enjoy endless plink-fests.

Overall Evaluation – 4/5 – This is a great map, so long as the Brits attack.

Balance Evaluation – Mostly Even to Slightly Axis Favored – I’ve seen both sides win convincingly, and though I’ve played it a lot, I’ve noticed no major trends.  Days of Wonder has it at 69/31 Axis, which I find rather surprising.  I can imagine how the standard Breakthrough deck, with its plethora of extra moves, could give the Germans a major advantage, as they will be able to easily and quickly move their forces up while making no sacrifice in terms of firepower.  That is a major reason I do not play with most of the Breakthrough cards.

First-Turn Win Possibility – None – An aggressive British player will take a pounding in the early phases of the game, but the structure of the map means that the battle will not be over until quite late.

Plink-Fest Danger – High – The potential for artillery-fans to drain all the fun out of this map is, sadly, high.


Scenario Review – Martinville Ridge

Martinville Ridge is the second scenario in the “Breakthrough” campaign in Campaign Book 1, by brumbarr44, for Memoir ’44.  It’s a quick and nasty battle in which the Axis player has the resources to come back from almost any situation – just like a number of the Normandy scenarios from the first Campaign Book, actually.

On July 15, the 116th Regiment started a flanking maneuver around Martinville in an effort to outflank the town’s defenders. The lead elements made good progress but Allied Command didn’t have a clear picture of the situation on the ground and ordered the units to halt and consolidate their positions.

The order didn’t reach the 2nd Battalion in a timely fashion and by the time its commander got the order, the Battalion was already far ahead and overlooking the town of La Madeleine. Rather than call the unit back, General Gerhardt decided to keep the battalion there and try to reinforce it. On July 16 he ordered Major Bingham to hold his ground so he could move forces up to reinforce and hopefully push the Germans off the ridge at Martinville.

German command, unaware of the situation developing on the right, put a concentrated effort into gaining control of the Bayeux Road and the recently lost Hill 122 that overlooked it. The German XI Parachute Corps made a strong attack to seize the hill but was eventually repelled, largely because of American air cover. German command’s failure to recognize and capitalize on the opportunity to smash the isolated battalions of the 116th helped put to an early end to the fight for Saint-Lô.

The stage is set, the battle lines drawn, and you are in command. The rest is history.

Here’s my photo of the map.

Martinville Ridge

Perhaps the most interesting thing about this opening setup is the Allied infantry out by the Axis baseline.  This will most likely be the center of the opening engagement, as the Axis player rushes to stomp a vulnerable unit, while the Allied player rushes units forward to engage.

The Allied player has a distinct advantage in overall force composition, with more tanks and more infantry than the Axis player.  The Allied forces are also evenly spread across the map, allowing advances in any sector.  Any coherent advance by the Allied player will put them in the lead.

However, the Axis player also has some advantages.  The Axis force is composed entirely of special forces, making it incredibly dangerous.  On top of that, the map is only to 5 medals, and there is an Axis medal on the map that is fairly easy to take.  A quick counter-attack in the center can be enough to turn the game around entirely.  This map leads to fast battles in which a lucky Axis player is incredibly hard to stop.

This is exactly how both of our games went.  The Allied player moved fast and hard, and looked on track for an easy victory.  Then, the Axis player took a few shots, moved a few troops, and snatched a last-turn victory.

Overall Evaluation – 4/5 – This is a fun fight, but the endgame can turn into such a luck-driven see-saw that there’s a good chance one player will walk away feeling burned.

Balance Evaluation – Generally Even – From the position of force composition, the Allies should have the advantage, and a little bit of luck in the opening infantry engagement can put them in a pretty solid position to win.  However, the Axis player’s ability to turn things around on a dime prevents me from giving the Allies the edge on this one.  DoW Online has it at 60%/40% Allies, but I have to wonder if that is at least in part caused by unskilled Axis players who don’t know how to turn the situation to their advantage.

Plink-Fest Danger – None – Neither side has the force to accomplish much with long-distance fire.

First-Turn Win Possibility – None – Neither side can put together much of an attack in their first couple of turns.

Scenario Review – Withdrawal from Hill 112 – With Video!

Withdrawal from Hill 112 is a Normandy scenario for Memoir ’44 from Campaign Book 1.  It’s the third scenario in the Flanking Caen mini-campaign.  All four of the Flanking Caen scenarios are interesting and reasonably balanced scenarios, pitting a slight Allied lead in overall forces against a very aggressive, and potentially lethal Axis force.  This scenario is interesting because of the limited mobility available to the Axis forces, balanced by their superior starting force position.

On June 29, Operation Epsom entered its fourth day. The British were holding onto a salient that incorporated high ground known as Hill 112 on the far side of the Odon River, near the village of Baron. The British 11th Armoured Division had a tentative hold and the Allies knew, thanks to intelligence reports, that the Germans were amassing armor for a counter-attack.

The German command made a preliminary push, sending the 9th and 10th SS Panzer Divisions and the 2nd SS ‘Das Reich’ into action along both sides of the Odon. Although the 11th Armoured Division was able to hold Hill 112, the British commander, Lieutenant-General Dempsey grew concerned about having his lead elements isolated on the far side of the river. He ordered them to withdraw back across the Odon, a decision that came back to haunt him when the Allies paid a heavy toll to reclaim the same ground nine days later.

Although Operation Epsom never quite achieved its original objective of flanking Caen, it did manage to draw the bulk of the German armor into the area which freed up the Americans on the right and opening the door for their break-out into hedgerow country.

The stage is set, the battle lines are drawn, and you are in command. The rest is history.

Though old, Campaign Book 1 is still available as an eBook, and I highly recommend it to any active Memoir 44 player.  However, that means it’s still considered classified at DoW.  So, here’s a bad photograph.

Withdrawl from Hill 112

The river dividing the map is pretty significant for the Axis.  Note that the bridge on the Axis side empties into a hedgerow, making it nearly useless for any sort of tactical reinforcement.  The Allies have it a bit easier, as their bridge is not only free from obstructions, but also protected from distant fire by a town.

Both sides are weak in the middle, and the action in this scenario is going to come down to the flanks.  The Axis have tank superiority, and with a good hand they can break the Allies on either side.  However, they need to be fast and consistent, because the Allies do have position in the center and greater flexibility.  Their bridge is open, and they can, in the right circumstances, move their tanks back and forth.  On the other hand, the Axis infantry in the center are almost entirely useless.  Should the Axis player take the time to move them up, it’s quite possible for the Allied player to make them pay by pressing an assault on either flank, or just plinking them from a distance.

On average, I think this map favors the Allied player, but a decisive Axis victory is a definite possibility.  We played this twice, switching sides, and the Allies won both times.  The first game turned into a last-turn nailbiter despite a mediocre Axis hand, while the second game was a brutal crushing of the Axis thanks to a complete lack of cards on their left flank.  DoW has this scenario at 60/40 Allies based on 148 reports.  I think that experienced players will even that up a little bit, but it definitely shows the advantage held by the Allies.

Overall Evaluation – 4/5 – This is a fun scenario with an interesting imbalance.  The Axis player will usually feel like they have a chance, because they do – even though, most of the time, the Allies will win it.

Balance Evaluation – Allied Favored – 60/40 is hard to argue with, and a mediocre hand will doom the Axis player every time.

First-Turn Win Possibility – Weak – The Axis can open up with a pretty devastating assault, but the strong Allied position makes it unlikely that this is a true knock-out blow.  That is, unless the Allies can’t follow up with anything stronger than a probe.

Plink-Fest Danger – Weak – The open space and the tanks turn this into a tank-brawl, and those don’t last very long.  Dice and cards will give one side or the other a quick advantage, and it’s all downhill from there.

Video – Unfortunately, the match we recorded was a somewhat boring smash-up of an immobile Axis side.  I just didn’t draw the cards to defend myself, and was broken on my own baseline.

Scenario Review – Moyland Wood

Moyland Wood is an official scenario for Memoir ’44 by the game’s creator, Richard Borg.  Set in Normandy, It’s a cracker of a map, and reliably offers an enormous brawl of mixed tanks and infantry right in the center of the map.  The Allies have a definite advantage, but it’s a fun battle with interesting decisions no matter what happens.

On the afternoon of the 16th the Royal Winnipeg Rifles supported by the 3rd Armor Battalion Scots Guards was ordered to take the hilly ground around Louisendorf. On its left the Regina Rifle Regiment with tank support was to clear the Moyland Wood.

The Winnipeg Rifles advance went well but the Regina Rifle Regiment ran into difficulties from the start. The wood had been reported clear but elements of 6th Parachute Division newly arrived from North Holland were deployed in a strong position along the fringe of the woods. As the Canadians moved to clear the wood, it was also shelled by German artillery. The failure to drive the Germans from Moyland Wood seriously delayed the 2nd Canadian Corps’ planned advance.

On the 19th, Battle Group Hauser and units from the 116th Panzer Division launched a counter attack. Throughout the night waves of Germans attacked the Allied infantry, as the Allied tanks had been withdrawn a few hours earlier to re-arm and re-fuel.

To recover lost ground, Brigadier Cabeldu ordered all uncommitted elements forward. Infantry and tanks moved out, preceded by a heavy barrage of artillery fire. The attack pushed the spent Germans back in less than two hours.

The stage is set, the battle lines are drawn, and you are in command. The rest is history.

Here’s the map.

Moyland Wood

The map is really divided into two major zones of engagement – the forest around Moyland, and the open area in front of Louisendorf.  Smart Allied players will try to move up tanks as quickly as possible so as to engage the numerically inferior Germans in the open center, and minimize losses near Moyland.  The Germans need to attack hard and fast in the center, knock out forward elements before the Canadians can move them to safety, and avoid the overwhelming counter-attack in the center which is always a looming possibility.  It’s always possible to pick up a medal or two near Moyland by pounding the Allied forces on the baseline, but unless the Canadians are pushed towards that sector by their cards, it’s more likely than not that better moves will be available in the center.

This map is a bit unusual in providing an opportunity for such a large brawl with fairly little preliminary movement on either side – that’s what makes it so fun.  It also has a more or less perfect artillery setup.  The German guns give them the ability to punish the Allies for being slow on the attack, but are in no way decisive given the huge forces that both sides can bring into the fray.

The Canadians have a definite numerical advantage, but need good cards to bring this into play.  The Germans are outnumbered but concentrated, and are in a good position to create localized fire superiority right at the beginning.  Both sides will suffer from a bad opening hand, and both sides will benefit from a hand full of assaults.  With over 400 battles played, Days of Wonder online has this at exactly 50/50.

This is a really, really good map.

Overall Evaluation – 5/5 – Few maps allow both sides to bring in so much infantry and armor all at once, and few maps are able to do so in such a balanced way.  Fun and interesting for both players.

Balance Evaluation –  Even – My gut tells me the Allies have the advantage just because of the forces available to them, but I know all too well how a bad opening hand can leave many of those units stranded near the baseline while isolated front-line infantry are mauled by a concentrated force.  Good cards will give the advantage to the Allies, but good cards are far from guaranteed.

First-Turn Win Possibility – Low – The Germans are in a position to damage some Allied infantry early, but only if they are left in place by the Allied player in his or her first turn.

Plink-Fest Danger – None – This is a battle that will be decided by massed tank and infantry combat, not long-distance shooting.

Scenario Review – Battle of the Bridgehead

Battle of the Bridgehead is an unofficial Normandy scenario for Memoir ’44 by forum poster brumbarr44.  I’ve played a few scenarios by him in the past, and they are usually solid.  This one features a few Canadian units versus the Hitler Youth and a SS panzer-grenadier element.  This is a fairly old scenario, and can be tough for a weak German player, but nevertheless provides an interesting battle for two players who know how to maneuver their tanks.

On D-Day +1 the Canadians sought to achieve their final D-Day objectives and push through to the airfields at Carpiquet.

Elements of the 9th Brigade consisting of the North Nova Scotia Highlanders and armour provided by the Sherbrooke Fusiliers advanced on Buron along the Buron-Authie axis toward Carpiquet. At Authie the Canadians ran into the first major German counter-attack against the allied bridgeheads.

The 12th SS Panzer Division consisted of HitlerJugend. Young, fanatical but inexperienced soldiers. They were however commanded by NCO’s who were hardened veterans of the Eastern campaigns. Among the lead elements was Standartenfurhrer (Colonel) Kurt Meyer and his 25th SS Panzer-Grenadier Regiment. Meyer’s orders were to strike at the beaches, his first task was to recapture Buron and Authie.

The Germans moved quickly on the unwary Canadians who had already lost men just in the taking of the villages. Casualties on both sides mounted as the North Novas proved to be a match for the HitlerJugend. The same cannot be said of the Sherbrooke Fusiliers whose out-gunned Shermans and green crews were not equal to Meyer’s skilled command. Nevertheless, many panzers were left burning on the field as well. Although the 9th Brigade pulled back to entrench the 25th SS was largely eliminated as an effective force.

The next day, elements of the 26th SS Panzer-Grenadier Regiment moved in on the 7th Brigade to the right of the 9th. Storming the beaches on D-Day left the 7th under-strength. The 26th SS although attacking piecemeal were able to force the Winnipeg Rifles into a difficult retreat. The Regina Rifles also found the enemy starting to show up in strength. Were it not for the timely arrival of tanks from the Sherbrooke Fusiliers, disaster would have surely ensued.

Kurt Meyer had out-fought the Canadians and the fierceness of his attack had left them uncommonly wary of tangling with SS units. Carpiquet, virtually in view of the lead Canadian elements, would not be reached for another month. Which was the next time that the Canadians saw major action.

Here’s the setup.

Bridgehead

First off, as this is a rather old scenario, it does not specify the use of Commonwealth Army rules for the Canadian forces in this battle.  I suppose that one could play with them, but that may have odd unintended consequences.  Then again, Stiff Upper Lip isn’t nearly as much of a game changer as is the Gung Ho ability of the US Marines, let alone the Banzai charge of the Japanese Army.

Note the 5 Canadian tanks on the field, to only 3 German tanks.  Combined with the wide open spaces, this gives the Allied player a significant advantage – IF he or she can get those two tanks out of the hedgerows in the right sector.

Also note that the battle is to 5 medals.  By the time the Allied player is closing in on the victory location at Carpiquet, the battle will be mostly over.

The hills and open spaces give both players a lot of room to maneuver around, leading to some interesting tactical decisions.  Infantry combat will fill out the medal rack for both players, but the real meat of this battle is going to be the tank duel.  In my opinion, the German player will need a little bit of tank luck for the battle to go his or her way, given the distinct firepower superiority the Allied player enjoys.  However, with a few lucky rolls the German player just might end up with the last tank on the board, especially if he or she can strike first, knock out an Allied tank right away, and take advantage of the hills for cover.

I rarely have the tank luck, so this isn’t the sort of map that I’ll ever fall in love with, but it’s not a bad map at all.

Overall Evaluation – 3/5 – The combination of open spaces, cover, fortified infantry, and mismatched armor makes for an interesting battle, but the potential for an Allied romp is high enough that I can’t rate this higher.  Less experienced players will also get slaughtered no matter who they play – there’s a lot of finesse to this one.

Balance Evaluation – Allied Favored – 5 tanks to 3 on a mostly open map is a pretty powerful advantage.  Days of Wonder Online has it at 51/49 Allies, which is a much tighter spread that I would expect.

First-Turn Win Possibility – Low – I suppose that if the Germans managed to knock out two Allied tanks on their first turn it might be hard for the Allied player to recover, but the chances of this happening are incredibly low.

Plink-Fest Danger – None – This is an open brawler map, and there is neither the right unit mix nor the right terrain for a plink-fest.


Scenario Review – Operation Seydlitz

Operation Seydlitz is a scenario from the Equipment Pack for Memoir ’44.   This is a battle on the East Front, taking place during the German drive towards Stalingrad.  As with many of the scenarios from the Equipment Pack, it has its problems, but manages to be a bit more fun than many of the others because it is quick, and has lots of cavalry.

July 1942 – Having survived the Soviet winter offensive, the Germans set about eradicating enemy forces far in their rear. Assembling a formidable collection of Infantry, Armor and Mounted units near the River Luchesa, they opened the attack with an intense Artillery bombardment on the dug-in Russian defenders. The German Cavalry brigade, assembled from reconnaissance battalions, used its superior mobility to outflank the Russian line, while German Armor and Infantry were able to successfully negotiate the Russian minefields. Caught in the middle, the Soviet forces soon began to collapse.

The stage is set, the battle lines are drawn, and you are in command. The rest is history.

Like all the scenarios from the Equipment Pack, the map is not available online.   Here’s a bad photograph.

Seydlitz

There are two important things to note about this setup.  First, the Germans have a nearly overwhelming firepower advantage against an enemy in fairly fixed positions.  The German artillery and mortar can plink the Russian front line to death with minimal risk.  The second thing to note is that the German player has three cavalry units on his right flank.

Cavalry is one of my favorite units, because they can do absolutely nothing but charge.  Thanks to their 2/1 attack rating, Cavalry are totally useless at range – but the itch to use them is so great that many players will throw them forward at the enemy even if that’s really not the best idea.  I’ve played this map a few times, and have not once seen the Cavalry held back.  Furthermore, they can actually accomplish quite a bit, all on their own.  With a little bit of support, the German cavalry can roll up the Russians on that flank, and go straight for the artillery.  With our House Rules in effect, Cavalry are the single best unit for killing Artillery, and knocking out the Russian artillery will almost guarantee a German victory.

So, this map can go one of two ways.  A cautious and serious German player will slowly move up units in the center, and plink the Russian front line to death.  A crazy German player will open up with a Cavalry charge.  In either case, the Germans are likely to win.  It’s just horribly imbalanced.

However, the odds are so obviously stacked against the Russians, especially given the 5 medal victory count, that there’s little incentive for the Russian player to be conservative.  Any map that creates a situation where both sides are crazily aggressive is bound to be fun, and this map delivers.

Operation Seydlitz is a quick and silly refresher between more serious maps.

General Evaluation – 3/5 – This can be a quick and fun map, or it can be a painfully brutal slog of attrition.

Balance Evaluation – Strongly German Favored – The Russian player has little prospect for victory no matter what the Germans do.

First-Turn Win Possibility – Minor – I suppose that the Germans could open with a Direct from HQ, take out the Russian bunker with their cavalry and artillery, and start the game with 2 medals.  But that’s pretty unlikely, and there are no other quick winning moves available to either side.

Plink-Fest Danger – High – A boring German player could use his mortar and artillery and tank to slowly batter the Russians to death, and there’s little the Russian player could do about it.

Scenario Review – Canal de la Haute Colme

Canal de la Haute Colme is an early-war scenario for Memoir ’44, and was published in the Equipment Pack.  Like many of the scenarios from the Equipment Pack, it has some problems.

In conjunction with an evening attack by the 11 Schützen, the SS-Regiment “Leibstandart Adolf Hitler” moved forward to try and break the French line around Dunkirk, splitting the 225th and 341th Regiments. But crossing the Canal de la Haute Colme turned out to be a nightmare: although stretched thin, French forces had deployed along all possible crossing points. The spirited German assault was blunted as night fell.

The stage is set, the battle lines are drawn and you are in Command. The rest is history.

As an official scenario, the map is not available online.  Here’s a bad photographCanal de la Haute Colme

The Germans have a distinct advantage on their right flank, where the French only have two dug-in infantry units to defend a river crossing.  If the Germans can push through at that point, then more than likely the game is over since the entire French baseline is an exit zone. However, the battle is not likely to start on that flank, as the Germans have a number of vulnerable units jammed up on the baseline on their left lank, within easy fire range of the French.

This is a very challenging map for the German player, because their force is just not quite enough to really force a crossing.  Given average cards and hands for both sides, the French should mangle the Germans on the approach and easily pick off any stragglers that make it across the river.  This doesn’t mean that a German win is impossible – it’s just really unlikely.

Many unbalanced maps are still fun.  Omaha Beach comes to mind.  I’ll play Omaha over and over as Americans, because every time you play, it feels like victory is just out of reach.  This map does not really capture that same feeling, because the nature of the obstacles and the force disposition is such that the scenario never really feels possible for the Germans.  Furthermore, the French player doesn’t really have all that much to do.  Most of his or her units can sit right where they until the end of the game, and fire upon the Germans as they advance.

It’s not broken, but it’s also not all that interesting.

General Evaluation – 2/5 – This map left both of us with a distinct feeling of meh.

Balance Evaluation – French favored – DoW Online has it at 60/40, which might be a bit generous for the Germans.

First-Turn Win Possibility – None – This is a slog map.

Plink-Fest Danger – Moderate – As crossing the canal is so dangerous for the German, he or she may be tempted to use Armor and Artillery to wear down the French before committing to the engagement.  The German player may also be tempted to pull back after a failed attempt at a crossing.  Neither of those scenarios would result in a terribly interesting game.